Disclaimer: This post is different from the short ones I usually write here. It’s long and a bit technical, so if you’re not interested in how web authentication and authorization work under the hood, feel free to skip this one.
Last week, while I was helping a colleague who doesn’t have much experience with OAuth, I realized that it only makes sense once you understand the fundamentals of how a website or web application tells who you are apart from what you’re allowed to do.
So the objective of this post is to explain the basics of authentication and authorization, how they evolved over time and how they relate to OAuth 2.0 and OpenID Connect today. I have used all these methods during my career, so I thought it would be useful to organize them in a single post.
Authentication vs authorization
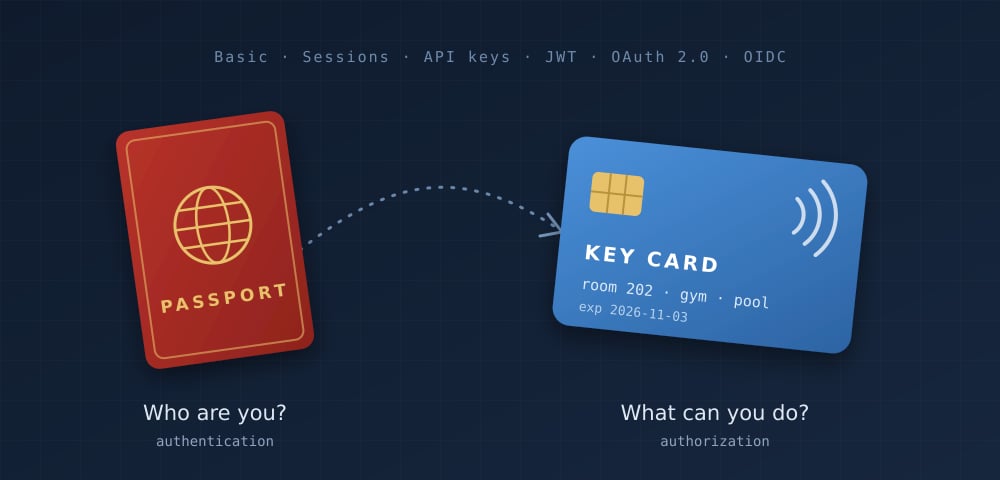
Authentication answers “who are you?” Authorization answers “what are you allowed to do?” I once read a good analogy about checking into a hotel, and I will use it here to explain the difference.
Picture yourself checking in:
- At the front desk you show your passport. The receptionist checks that you are the person on the booking. That is authentication.
- They hand you a key card. The card opens room 202, the gym and the pool, but not room 403 or the kitchen. That is authorization.
Two details from this analogy matter for everything that follows:
- Ideally, the door never sees your passport. It only checks the card. Later in this post, the card will be a session cookie or a token. The first scheme we’ll look at, Basic Auth, doesn’t work like this yet: it shows the passport at every door, and that’s exactly its weakness.
- The card can be given to someone else. If you hand it to a friend, the door lets them in. Whoever holds the card has the access. Security people call this a bearer credential, and it explains why we protect tokens so carefully.
Authentication almost always comes first: you can’t decide what someone may do until you know who they are. But they are separate problems, solved by separate parts of a system, and mixing them up is the root of most confusion about OAuth.
Step 1: HTTP Basic Auth
The simplest scheme the web has is HTTP Basic Authentication. The client sends the username and password with every single request.
It works like this:
- The browser asks for a protected page.
- The server replies
401 Unauthorizedwith the headerWWW-Authenticate: Basic realm="admin". The browser shows its grey login pop-up. - The browser joins
username:password, Base64-encodes it and resends the request with anAuthorizationheader.
GET /admin HTTP/1.1
Host: example.com
Authorization: Basic anVhbjpteXBhc3N3b3Jk
anVhbjpteXBhc3N3b3Jk is just juan:mypassword in Base64. Base64 is encoding, not encryption: anyone who sees the header can decode it in one second. That’s why Basic Auth is only acceptable over HTTPS.
Why it’s still around: it’s trivial to implement, every HTTP client supports it, and it’s fine for quick internal tools, a staging site, or a machine calling an API.
Why it isn’t enough:
- The real password travels on every request, so every request is a chance to leak it.
- There’s no clean way to log out; the browser keeps resending the credentials until you close it.
- There’s no way to give limited access. Whoever has the password can do everything you can.
- The server must check the password every time, which is slow if passwords are properly hashed.
In the hotel analogy: there is no key card. You show your passport at every door.
Step 2: Sessions and cookies (log in once)
Sessions fix the biggest problem of Basic Auth: you send your password once, and get a key card back.
- You fill in a login form and
POSTyour username and password. - The server checks the password against a stored hash.
- If it matches, the server creates a session: a record in its database or cache, like
session 7f3a… → user 42, expires in 2 hours. - It sends the random session ID back in a cookie.
- The browser attaches that cookie to every following request. The server looks up the ID and knows who you are.
HTTP/1.1 200 OK
Set-Cookie: session=7f3a9c2e81b4; HttpOnly; Secure; SameSite=Lax
Those three flags are worth knowing early:
HttpOnly— JavaScript can’t read the cookie, so a cross-site scripting (XSS) bug can’t simply steal it.Secure— the cookie is only sent over HTTPS.SameSite— the browser doesn’t attach it to requests started by other sites, which blocks most cross-site request forgery (CSRF).
What we gained: the password crosses the network once, logout is easy (delete the session on the server), and the server can revoke a session at any time.
What it costs: the server has to remember every session. That’s fine for one web app, but awkward when you have mobile apps, many microservices, or several domains that all need to know who the user is. Cookies are also tied to a browser and a domain, so they’re a poor fit for APIs called by other programs.
Step 3: API keys and bearer tokens (credentials for programs)
When a program talks to an API, there’s no login form and often no browser. The usual answer is a long random string the program sends with each request.
An API key identifies the calling application, usually a project or account, rather than a person. You generate it in a dashboard and paste it into your server’s config:
GET /v1/forecast?city=Paris HTTP/1.1
X-API-Key: demo_key_not_a_real_secret_123
A bearer token is the same idea with a standard header. “Bearer” means exactly what the hotel card taught us: whoever bears it gets in.
GET /v1/me HTTP/1.1
Authorization: Bearer eyJhbGciOiJSUzI1NiIs...Rules of thumb:
- Treat keys and tokens like passwords. Never commit them to Git, never put them in front-end JavaScript, never log them.
- Give each key the smallest set of permissions it needs, and rotate it if it leaks.
- Prefer short-lived tokens over long-lived keys: a token that expires in an hour is worth much less to a thief.
That last point raises a question. If tokens are short-lived and handed out by some login service, how does the API know a token is real without calling that service every time? One popular answer is the JWT.
Step 4: JWT (a token that carries its own proof)
A JSON Web Token is a token the API can verify by itself, without asking anyone. It’s three Base64URL pieces joined by dots: header.payload.signature.
// header
{ "alg": "RS256", "typ": "JWT" }

// payload (the "claims")
{
  "iss": "https://login.example.com",
  "sub": "user-42",
  "aud": "https://api.example.com",
  "scope": "mail:read",
  "exp": 1793620800
}
The login server signs the header and payload with its private key. The API holds the matching public key. If anyone changes even one character of the payload, the signature no longer matches and the API rejects the token. The API checks the signature, the issuer (iss), the audience (aud) and the expiry (exp), and then it knows who the user is (sub) and what the token allows (scope).
Things that trip people up:
- A JWT is signed, not encrypted. Paste one into a JWT debugger and you can read everything. Never put secrets in the payload.
- Always verify the signature with a well-known library, and reject
"alg": "none". - You can’t easily revoke a JWT. It stays valid until it expires, so keep access tokens short-lived (minutes to an hour).
- JWT is a format, not a protocol. It says what a token looks like, not how you get one. That’s the job of OAuth.
Delegation
Everything so far is about you accessing your stuff. OAuth solves a different problem: letting another application access your stuff, on your behalf, with limited rights.
Back to the hotel. A friend arrives before you and needs to get into your room to drop off their luggage. The lazy answer is to give them your passport and your key card. That’s a terrible idea:
- Your friend can now do everything you can: open your room, charge room service to your bill, even check out in your name.
- You can’t give them only your room, or only until tonight.
- To take the access back, you have to cancel your card at the desk, and every other copy you handed out stops working too.
- If your friend loses them, whoever finds them is you, as far as the hotel is concerned.
What you really do is go to the front desk and ask for a second card. The receptionist checks that it’s really you, asks what the card should open, and issues a valet key: it opens room 202 only, it stops working tomorrow, and you can cancel it at the desk at any time. Your friend never sees your passport. OAuth is the protocol for issuing valet keys.
Step 5: OAuth 2.0 (delegated authorization)
OAuth 2.0 is a framework for an app to get an access token that lets it call an API on a user’s behalf, without ever seeing the user’s password. Notice the word: authorization. OAuth is about what the app may do, not about who the user is.
Now the same idea on the web. Say it’s the evening before your flight and you want to print your flight tickets. They’re in your Gmail, and the printer in the business center has a touch screen with a “Print from Gmail” button. Without OAuth, the only way for the printer to get your tickets would be for you to type your Google password into it. From then on it could do anything you can: read all your email, send messages in your name, even change your password. That’s the passport hand-over again, and it has a name: the password anti-pattern. With OAuth, the printer asks Google for a valet key instead: permission to read your email for a short time, which you can cancel from your Google account.
The four roles
| Role | What it is | Hotel | Business center example |
|---|---|---|---|
| Resource owner | The user who owns the data | You | You |
| Client | The app that wants access | Your friend | The business center printer |
| Authorization server | Logs the user in, asks for consent, issues tokens | The front desk | Google’s login and consent screens |
| Resource server | The API that holds the data | The door of room 202 | Gmail API |
Scopes and consent
The client asks for scopes, named permissions such as gmail.readonly. The authorization server shows the user a consent screen (“Hotel Printer wants to view your email messages”) and the user approves or refuses. The token that comes out is limited to those scopes. That’s the valet key: one door, limited time, cancellable.
The authorization code flow, step by step
This is the flow you’ll use for almost every real app:
- You tap “Print from Gmail” on the printer’s touch screen.
- The printer’s screen sends you to Google’s sign-in page (the
/authorizeendpoint), passing along itsclient_id, thescope, aredirect_uri, a randomstatevalue and a PKCEcode_challenge(more below). - You log in at Google, not in the printer’s app, and approve the consent screen.
- Google sends you back to the printer’s
redirect_uriwith a short-lived, single-use authorization code. - The printer’s backend sends that code to Google’s
/tokenendpoint, together with its client credentials and the PKCEcode_verifier. This call happens server to server, not through the browser. - Google returns an access token (and often a refresh token).
- The printer calls the Gmail API with
Authorization: Bearer <access token>, finds the email with your flight tickets and prints them.
Read it top to bottom: everything above step 5 goes through the browser; the tokens only ever travel on the highlighted server-to-server lines.
Why the extra hop with the code? The browser’s address bar, history and logs are leaky places. Only the short-lived code passes through them; the valuable token is handed over on a direct, authenticated back-channel.
PKCE and state
state protects you from being handed someone else’s key. Before sending you to Google, the printer makes up a random value, remembers it, and adds it to the request. Google hands it back unchanged in step 4, and the printer only accepts the code if the value matches. Without it, an attacker could start the flow with their own Google account, stop just before step 4, and trick you into opening that last link. The printer would then be connected to the attacker’s account, and anything you saved through it would end up with them. This is a kind of cross-site request forgery (CSRF).
In the hotel: when you ask the desk for a valet key, they give you a numbered ticket, and you only accept a card that comes with your number. Nobody can slip you the key to their room and have you leave your luggage there.
PKCE (“pixie”) makes a stolen code useless. The code travels through the browser, inside a URL, so it can leak through browser history, logs, or, on phones, another app that registers the same return address. With PKCE, the client invents a secret code_verifier, sends only its hash (code_challenge) in step 2, and reveals the verifier in step 5. The hash can’t be turned back into the verifier, so someone holding only the code can’t finish the exchange.
In the hotel: when you order the valet key, you tear a ticket in half, give one half to the desk and keep the other. The desk gives you a pickup slip (the code), and to collect the card you have to show the slip and the matching half. A thief who steals the slip still can’t collect the card.
PKCE was built for mobile and single-page apps, which can’t keep a client secret: anything shipped inside an app or in JavaScript can be pulled out by whoever downloads it. Today it’s recommended for every client.
Other grant types
| Grant | Use it when | Status |
|---|---|---|
| Authorization code + PKCE | A user is present: web, mobile, single-page apps | The default |
| Client credentials | Machine-to-machine, no user involved (a cron job calling an API) | Recommended |
| Device authorization | Devices with no keyboard: smart TVs, CLIs (“go to this URL and enter code ABCD”) | Recommended |
| Refresh token | Getting a new access token without asking the user again | Recommended |
| Implicit | Old single-page apps; token returned straight in the URL | Deprecated |
| Resource owner password | App collects the user’s password itself | Deprecated |
Access tokens and refresh tokens
Access tokens are short-lived on purpose, often minutes to an hour. When one expires, the client sends its refresh token to the /token endpoint and gets a fresh access token without bothering the user. Refresh tokens are long-lived and powerful, so they stay on the server (or in secure device storage), and good authorization servers rotate them on every use. When the user clicks “Remove access” in their Google account, the refresh token is revoked and the app is cut off.
An access token can be a JWT the API verifies itself, or an opaque random string the API checks with the authorization server’s introspection endpoint. OAuth deliberately doesn’t say which. And most importantly: the access token is meant for the API, not for the client. The client shouldn’t open it and treat its contents as proof of who the user is.
Step 6: OpenID Connect (authentication on top of OAuth)
Once OAuth existed, everyone wanted to use it for “Sign in with Google”. The trouble is that OAuth only says “this app may read your email”. It doesn’t reliably say who approved that, when, or for which app. Teams built their own shaky login schemes on top, often by calling some “get profile” API with the access token, and some of those were exploitable.
OpenID Connect (OIDC, finalized in 2014) fixes this by adding a thin, standard identity layer to the same authorization code flow:
- The client adds the scope
openid(plus optionalprofileandemail). - The
/tokenresponse now contains a third thing: an ID token. - The ID token is always a signed JWT, written for the client, describing the login event.
{
  "iss": "https://accounts.google.com",
  "sub": "110169484474386276334",
  "aud": "hotel-printer-client-id",
  "exp": 1793620800,
  "iat": 1793617200,
  "nonce": "n-0S6_WzA2Mj",
  "email": "juan@example.com",
  "name": "Juan"
}
The client checks the signature, that iss is the provider it expected, that aud is its own client ID, that it hasn’t expired, and that nonce matches the one it sent (this prevents replaying an old token). Then the user is logged in, identified by the pair iss + sub, which never changes even if the email does.
OIDC also standardizes the plumbing around it:
- a UserInfo endpoint to fetch extra profile claims with the access token;
- a discovery document at
/.well-known/openid-configurationlisting every endpoint and the public keys (JWKS), so libraries configure themselves from one URL; - options for logout and session management.
The one-liner to remember:
| Token | Who reads it | What it says |
|---|---|---|
| ID token | The client app | Who the user is and how they just logged in (authentication) |
| Access token | The API | What the app is allowed to do (authorization) |
| Refresh token | The authorization server | “Please give me a new access token” |
In hotel terms: the ID token is the receptionist’s note to the app saying “we checked this guest’s passport at 14:02”. The access token is the key card the doors read.
Summary
Each step on this path fixed something the previous one couldn’t do, and the hotel has been with us the whole way:
| Mechanism | Hotel version | Use it for |
|---|---|---|
| Basic Auth | Show your passport at every door | Internal tools and quick scripts, over HTTPS only |
| Session cookie | Passport once at the desk, key card after | Classic server-rendered web apps |
| API key | A supplier’s badge: it names a company, not a person | Programs calling a third-party API |
| Bearer token | A key card that works for whoever holds it | Sending an access token to an API |
| JWT | A key card with a hologram the door can check by itself | Most access tokens, and every ID token |
| OAuth 2.0 | A valet key from the front desk | Letting the business center printer read your email to print your tickets, without your password |
| OpenID Connect | The desk’s signed note telling an app who you are | “Sign in with Google”, company single sign-on |
Next time my colleague and I go through our OAuth setup, I hope all those redirects, codes and tokens will look less like magic and more like a hotel front desk doing its job.